20 small pantry organization ideas for tight spaces — pantry zones, door storage, pull-out shelves, basket systems, and budget fixes under $30.
Most small pantry organization ideas assume you have a walk-in pantry with good lighting and generous shelving. You probably don’t. This guide is for the other kind — the closet-style pantry where the door barely shuts, and one wrong move sends a can of chickpeas rolling across the kitchen floor.
You don’t need a renovation or a weekend project. The small pantry organization ideas in this guide are built around zones, visibility, and the right tools — nothing more.
Set Up Pantry Zones Before You Buy Anything
This is the step people skip, and it’s why most pantries look exactly the same six weeks after being “organized.”
A pantry zone is a shelf section dedicated to one food category. When every item has a home, you stop buying three jars of the same spice because you couldn’t find the first two.
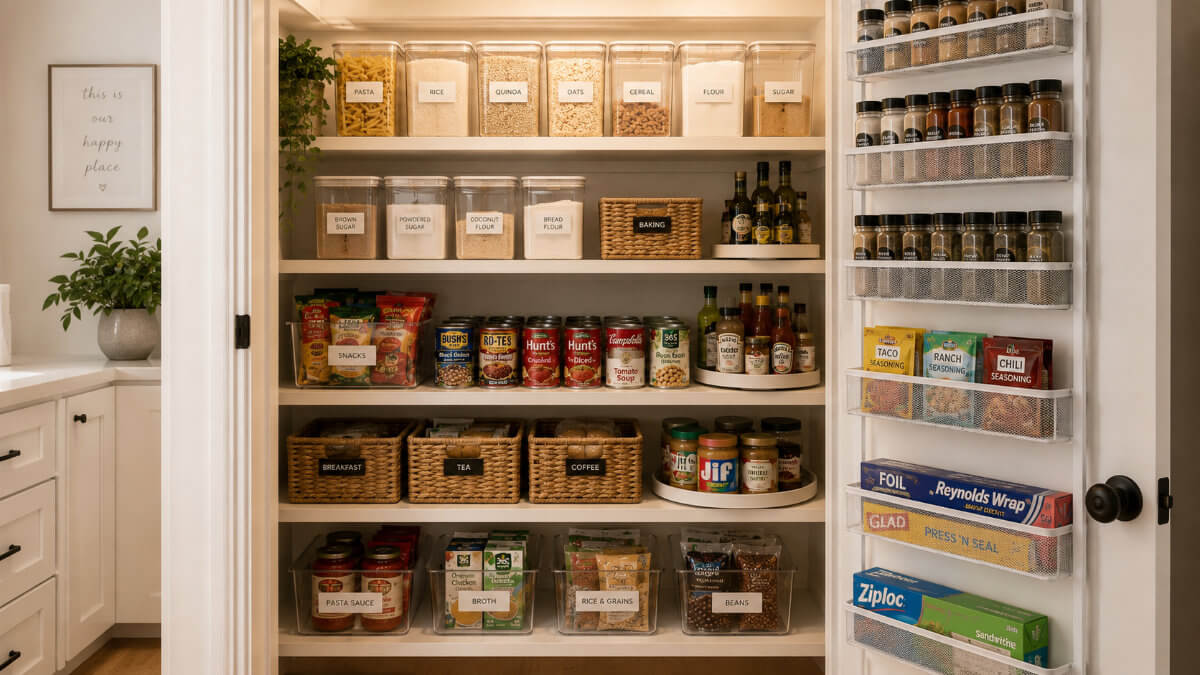
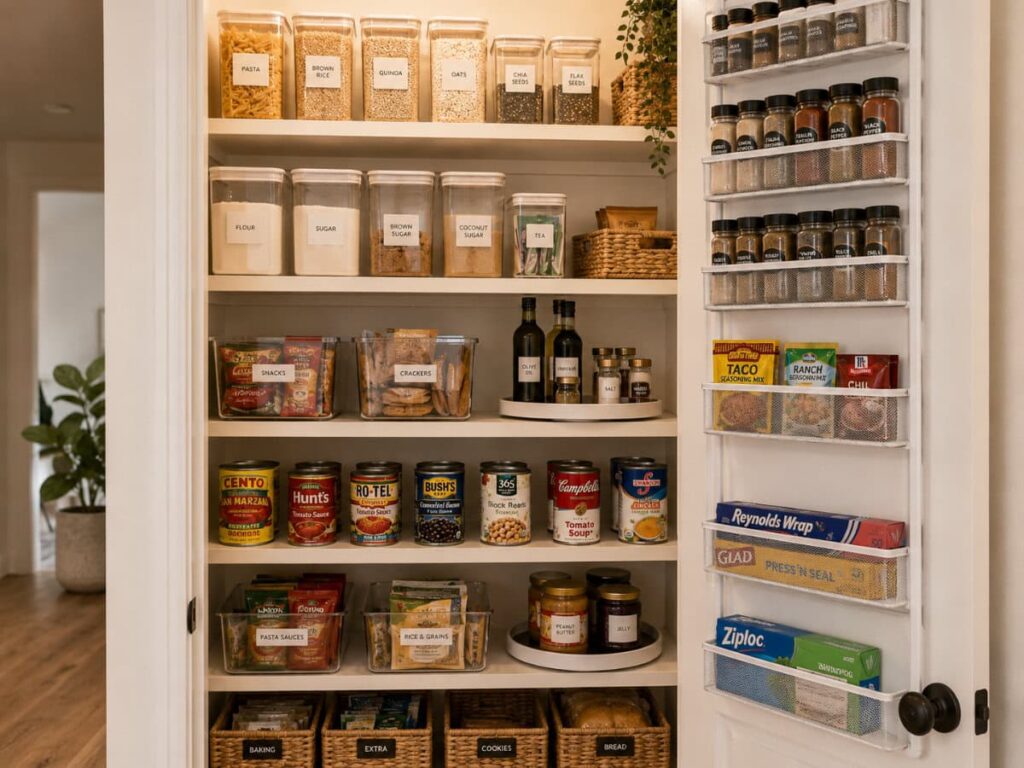
The 7 pantry zones that work in most small kitchens:
Zone 1 — Breakfast: Cereal, oatmeal, granola, pancake mix, coffee supplies.
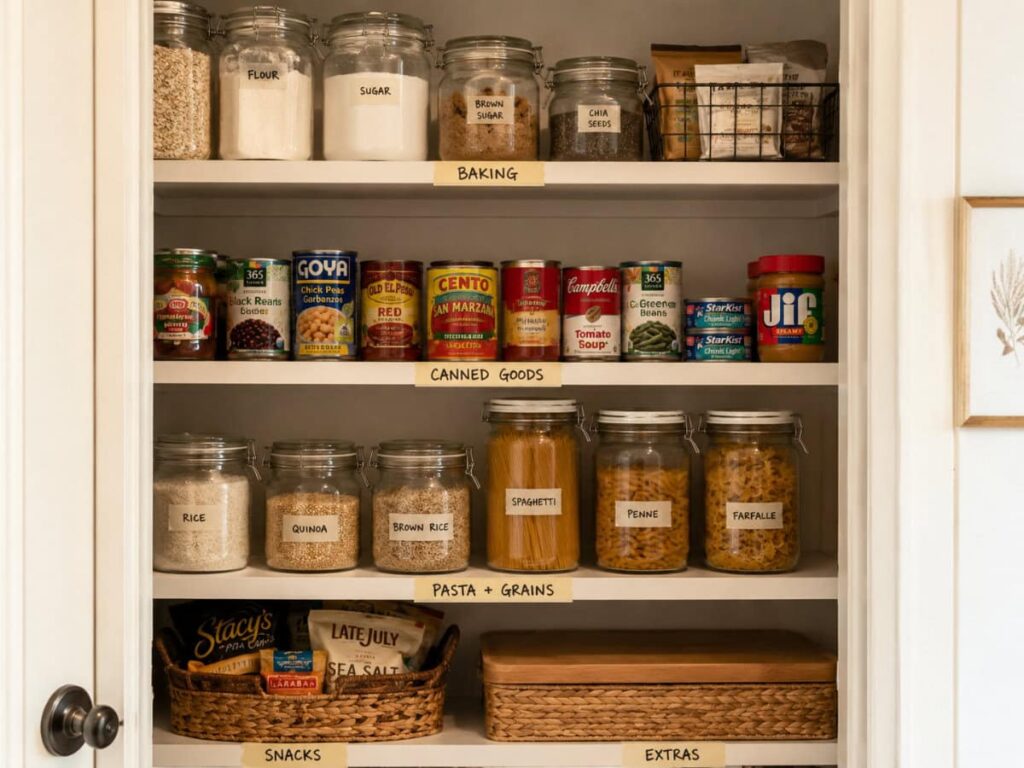
Zone 2 — Baking: Flour, sugar, baking powder, cocoa, vanilla extract, sprinkles.
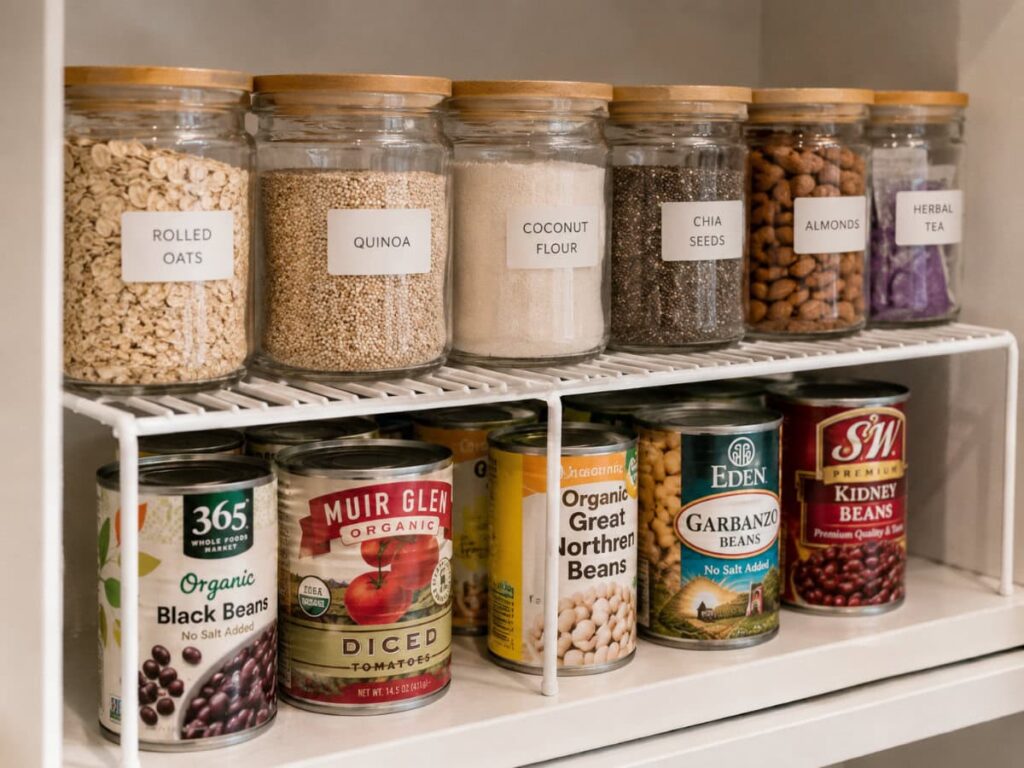
Zone 3 — Grains and Pasta: Rice, quinoa, lentils, pasta, breadcrumbs, couscous.
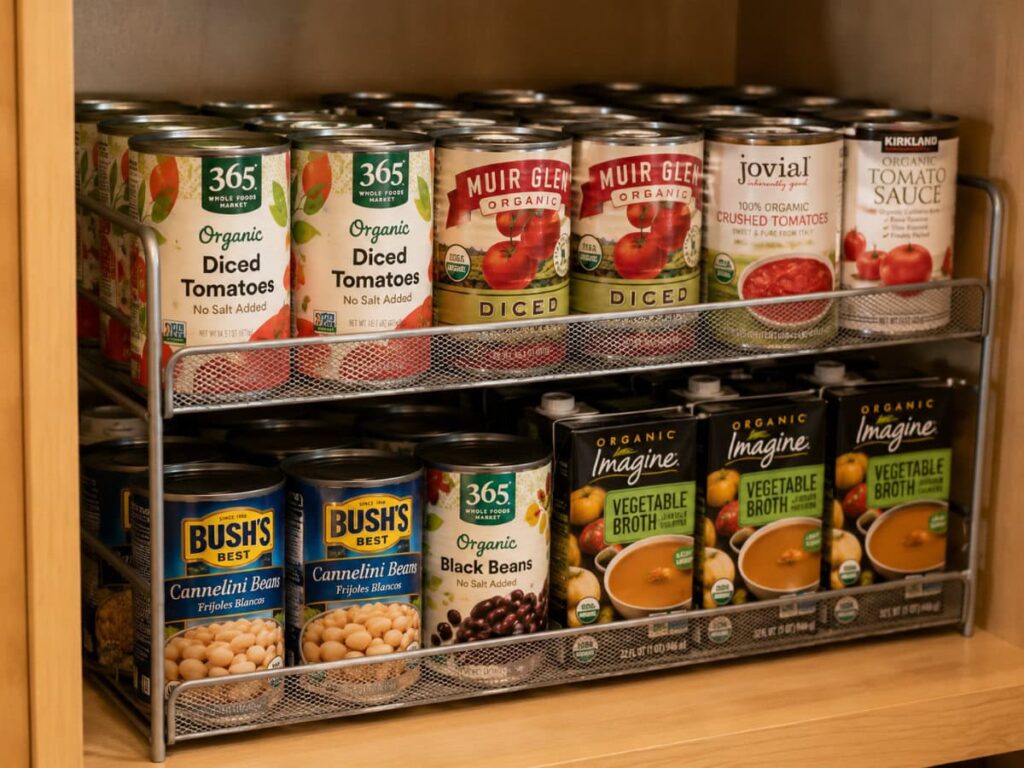
Zone 4 — Canned Goods: Beans, tomatoes, broth, coconut milk, tuna, soups.
Zone 5 — Snacks: Crackers, nuts, dried fruit, protein bars, popcorn.
Zone 6 — Drinks and Extras: Sparkling water, tea, extra olive oil, vinegar, hot sauce.
Zone 7 — Cooking Essentials: Sauces, condiments, spice packets, bouillon, cooking spray.
Sketch your zones on paper before touching anything. Everyday items go at eye level. Heavy things go at the bottom. Stuff you use twice a year goes on the top shelf. Five minutes of planning here saves hours of redoing it later.
20 Small Pantry Organization Ideas
1. Empty Everything Out First
Nothing works until the pantry is completely empty. Pull it all out, check every expiration date, and be honest about what’s actually getting used. If it’s been sitting untouched for twelve months and it’s not a genuine staple, it doesn’t go back in.
While the shelves are bare, wipe them down and vacuum the floor. Starting clean makes the whole process less frustrating. This is also the step most people skip — which is exactly why their pantry looks the same a month later.
2. Plan Your Zones Before You Buy Bins
Zone planning is more important than any storage product on this list. Don’t buy bins first and then try to build a system around them. Figure out where each zone lives, then buy storage that fits those zones.
A rough sketch on paper — shelf one holds breakfast and baking, shelf two holds grains and cans, shelf three holds snacks — takes five minutes and prevents buying organizers that don’t fit how you actually cook.
3. Use a Shelf Riser to Double Storage Per Shelf
Standard pantry shelves have 12 to 16 inches of vertical space between them. A can of beans needs about five. A shelf riser fills that gap by creating an upper and lower tier on a single shelf, which in practice doubles what fits there.
The iDesign Linus Shelf Riser (around $16 for two) sits directly on the shelf surface with no installation. Stack cans on the lower level, jars and boxes on top. Good option if you rent and can’t make permanent changes.
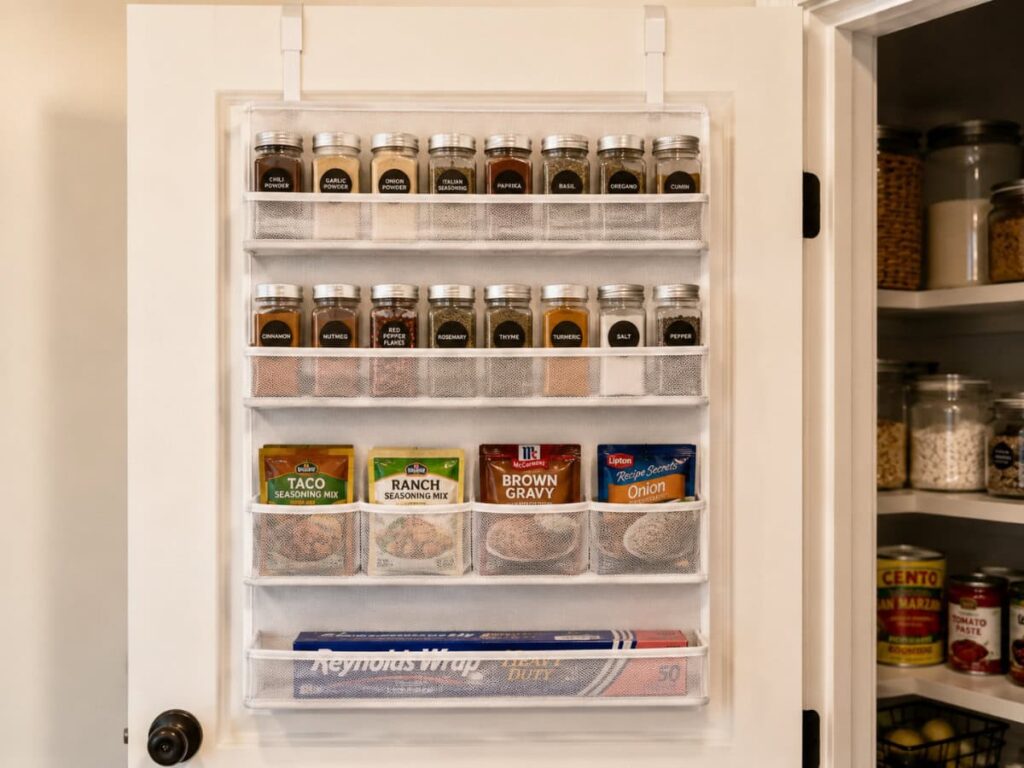
4. Install an Over-the-Door Organizer
The back of the pantry door is almost always completely wasted. An over-the-door organizer turns it into six to eight storage pockets without taking anything away from the shelves.
The SimpleHouseware Over Door Pantry Organizer (around $25) holds spice jars, seasoning packets, snack bars, foil rolls, and any small item that keeps getting buried in bins. It hooks over the door with no tools and no screws, so you can take it down without leaving a mark.
5. Add a Lazy Susan for Deep Shelves
Deep shelves create a dead zone at the back where things get pushed and forgotten. A lazy susan brings everything to the front with one spin — you can see every label without moving anything.
The mDesign Lazy Susan Turntable (around $17 for two) handles oils, vinegars, soy sauce, hot sauce, and canned goods well. If you want to compare options before buying, The Container Store’s pantry organizer section has a solid range of lazy susans worth browsing. Put one on any shelf where things keep disappearing to the back.
6. Decant Dry Goods Into Clear Airtight Containers
Cardboard boxes tip over, take up awkward space, and don’t show you how much is left. Clear, airtight containers stack cleanly and let you see fill levels from across the room.
The OXO Good Grips POP Container Starter Set (around $35 for four) works well for flour, oats, granola, pasta, rice, and coffee. You don’t have to decant everything at once — start with the five staples you reach for most. The shelf space it frees up is noticeable after just those few items.
7. Stand Foil and Wrap Boxes in Magazine File Holders
Foil, parchment paper, plastic wrap, and freezer bags are awkward shapes that take over a shelf when laid flat. Standing them upright in metal magazine holders fixes this.
The SimpleHouseware Metal Magazine File Holder (around $10 for six) fits three to four boxes per holder. The shelf stays clean and every box is reachable without digging. The same setup works for cutting boards and baking sheets when placed at the end of a shelf.
8. Clip Under-Shelf Hanging Baskets Underneath
The underside of a pantry shelf is free storage that almost no one uses. An under-shelf basket clips to the shelf above and creates a hanging pocket below it — useful for snack bags, reusable bags, or produce netting that doesn’t need a dedicated bin.
The iDesign Linus Under Cabinet Basket (around $12) clips on without tools and holds around five pounds. One under the snack shelf, one under the baking shelf — each one adds a storage category without consuming any existing shelf space.
9. Stack Cans With a Rolling Can Organizer
Cans in a pile mean the one you need is always at the bottom, and the stack falls over every time you pull one out. A rolling can organizer creates a first-in, first-out system — new cans go in the back, older ones roll to the front automatically.
The Simple Houseware Stackable Can Rack Organizer (around $15) holds up to 36 cans and connects with additional units if you need more. Once it’s in the canned goods zone, your stock actually rotates instead of building up a graveyard of things you forgot you had.
10. Label Every Zone, Bin, and Container
Labels are what keep the system working past week two. Without them, other people put things back wherever, and the zones slowly collapse.
A NIIMBOT Label Maker (around $22) prints clean labels quickly. Chalkboard labels with a white chalk marker (around $8 for a set) are easier to update when you reorganize. Either way, label every bin, every container, and every shelf zone. It takes twenty minutes and it’s what separates a system that lasts from one that doesn’t.
11. Use Tension Rods as Pan Dividers
Cutting boards, baking sheets, and muffin tins are nearly impossible to store flat without the whole stack becoming a puzzle. Two tension rods installed vertically on a shelf create individual slots — pull out one pan without touching the others.
Spring-loaded tension rods cost around $5 for a two-pack at any hardware store. No drilling required. Set them two to three inches apart and slot each pan in like a file. One setup handles five to six pans in the space that used to hold two stacked badly.
12. Add Battery-Powered LED Lights
A dark pantry is a disorganized pantry. If you’re squinting to see the back of a shelf, you’ll keep buying things you already own because you can’t see them.
Rechargeable LED motion-sensor strip lights (around $14 for two) stick to the underside of a shelf with adhesive backing and turn on when you open the door. No wiring, no screws. Particularly useful in rental spaces where replacing the existing light fixture isn’t an option.
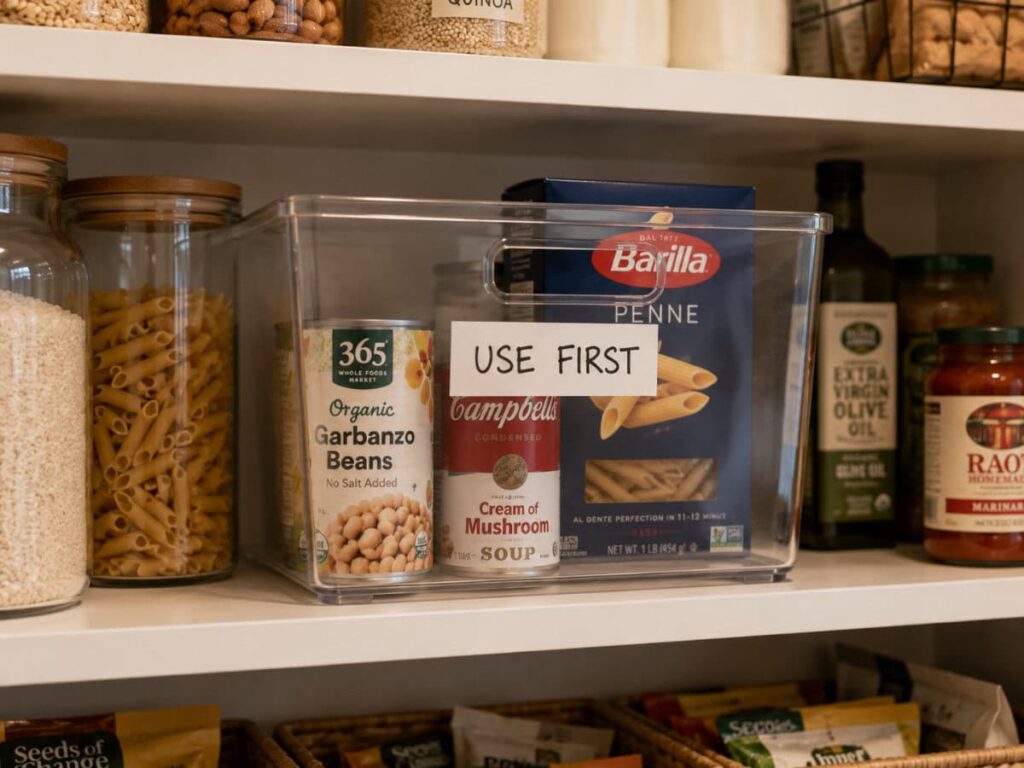
13. Keep a “Use First” Bin at Eye Level
Most food waste in a small pantry comes from items that quietly expire behind other items. One labeled bin at eye level — “Use First” or “Use This Week” — creates a simple rotation system that actually gets used.
Move anything close to expiring into that bin every time you grocery shop. It becomes the first place everyone checks before cooking. A bin in a different color from the rest of the shelf makes it easy to spot at a glance.
14. Keep Snacks in One Dedicated Bin
Loose snack bags scatter across a shelf faster than anything else. One dedicated snack bin at an accessible height keeps the category contained.
A Sterilite Clear Bin with Handles (around $8) does the job well. Everything snack-related goes in, nothing else. When it empties out, that’s the signal to restock. The handles let you carry the whole bin to the counter when kids are choosing what to take.
15. Group by Meal Type, Not Just Category
Organizing purely by food category — all cans together, all pasta together — is the default approach. It works, but grouping by meal type works better in tight spaces.
Keep taco night supplies together: shells, salsa, beans, and seasoning. Pasta night in one section: pasta, canned tomatoes, olive oil, dried herbs. Soup supplies in another. When you’re deciding what to cook, you scan by meal rather than mentally building a recipe from scattered ingredients across five different shelf sections.
16. Mount a Spice Rack on the Inside Wall
Spices eating up shelf space is a problem that’s easier to fix than most people realize. The inside walls of a pantry closet are almost always completely bare — that’s where the spices should go.
The Spectrum Diversified Wall-Mount Two-Tier Spice Rack (around $20) holds 20 jars and needs two screws. If you can’t drill, 3M Command Large Hooks (around $8 for four) can hold a lightweight rack with adhesive strips instead. Wall space for spices frees up eye-level shelf space for the things you actually need to see.
17. Break Down Packaging the Day Groceries Arrive
A box of pasta takes two to three times more shelf space than the pasta itself does. Cardboard packaging is the single biggest space thief in most pantries, and it’s an easy fix.
Break down bulky packaging the same day groceries come in. Transfer pasta, grains, rice, and snacks into containers or zip-lock bags and recycle the cardboard immediately. Do this consistently, and you’ll get back roughly a full shelf’s worth of space over time.
18. Hang Bag Clips and Small Tools With Command Hooks
Bag clips, bottle openers, and small kitchen tools accumulate on pantry shelves because there’s nowhere else obvious to put them. A few Command hooks on the inside wall or door frame solve this.
3M Command Large Hooks (around $8 for four) hold up to three pounds each and come off without damaging paint or wood. Useful in any kitchen, but especially in apartments where drilling isn’t an option. For more no-drill kitchen storage ideas, the kitchen counter organization ideas guide has approaches that work well alongside pantry organization.
19. Add a Rolling Cart Below the Bottom Shelf
If your pantry has floor clearance, a small rolling cart adds storage without touching the shelves. It slides in when not in use and rolls out when you need something.
The Honey-Can-Do Steel Rolling Storage Cart (around $35, three tiers) handles produce, onions, garlic, and root vegetables on the lower tiers and keeps extra paper goods on top. For kitchens that have run out of shelf options, it’s one of the better under-$50 additions available. The small kitchen storage ideas guide covers how it fits into a wider kitchen storage setup.
20. Do a Five-Minute Reset Each Week
Every pantry system eventually gets tested by a busy week, groceries that don’t fit neatly in the right zones, or someone who puts the pasta with the snacks. The pantries that stay organized have one thing in common: a weekly reset habit.
Five minutes after the grocery run. Put things back in their zones, move anything expiring soon to the “use first” bin, and throw out anything empty. That’s it. Skip this for a few months, and you’re back to the two-hour overhaul.
How to Organize a Small Pantry Without Buying Anything
No budget right now? Several of the best small pantry organization ideas cost nothing at all.
Empty the pantry completely and throw out expired items. That alone opens up space. Then rearrange using the 7-zone approach above — everyday items at eye level, heavy things at the bottom, rarely used items up top.
Use shoeboxes or cardboard as temporary dividers to separate categories on the shelves. Flatten all outer packaging to cut bulk. Label zone sections with masking tape and a permanent marker.
Then look for non-food items that crept in. Cleaning products, batteries, light bulbs, random tools — they end up in pantries because it’s convenient, and they quietly eat a shelf. Moving them to where they actually belong often frees up more space than any bin or basket would.
Frequently Asked Questions
What is the best way to organize a small pantry?
Empty it first, then plan your zones before you buy anything. Get everyday items to eye level, use vertical space with shelf risers and door organizers, and keep a weekly reset habit. The products matter less than the zone structure. A well-zoned pantry with basic storage beats a beautifully equipped pantry with no system.
What are the 7 pantry zones?
Breakfast, baking, grains and pasta, canned goods, snacks, drinks and extras, and cooking essentials. Each zone gets a dedicated shelf section. Once the zones are set and labeled, putting groceries away takes half the time — everything has a clear home.
How do you organize the perfect pantry?
Zones that match how you actually cook, visibility so nothing hides at the back, and a five-minute weekly reset. That’s the whole system. The storage products support those three things — they don’t replace them.
How do you organize a pantry without buying anything?
Throw out what’s expired. Rearrange by zones. Use shoeboxes as shelf dividers. Flatten packaging to cut bulk. Remove everything that doesn’t belong in a pantry — cleaning supplies, tools, random non-food items. Most small pantries have a full shelf worth of space hiding behind things that shouldn’t be there.